Many of you know Lady is autistic. At the suggestion of my mother, I am going to start including things that help us cope and work through raising a child with autism.
And this is my first post. Lady struggles with fine motor dexterity. This morning we were trying to trace letters and she was about to melt down. So, what I did was using my fingernail, I gently traced the letter on her left arm as she was tracing it with her right hand on the paper. She would follow my pattern, so she formed the letters correctly, but I wouldn't begin until she started moving the pencil on the paper. She needed that sensory motivation to complete the assignment. I also would use the pad of my finger as if it were a pencil eraser and rub her arm over the spot where I just traced the letter so we could start a new letter. I also did that if she erased on her paper. She responded beautifully. We have some great looking pages of A's, B's, and C's.
Thursday, September 16, 2010
Wednesday, September 1, 2010
Headboard: Anthropologie attempt
 So I saw a wall about 4 years ago in an Anthropologie store back east. I fell in love. My mom came to visit me this week, and we needed a project. I had this one stewing for about four years and we thought we'd take on the challenge. And, true to form, it was a challenge, with many layers of work to complete the project. What were we thinking!?! We were attempting to recreate the Anthro wall, but modify it to match the bird painting I love.
 We started with this frame. 2x12x8 foot boards, but in half so they were four feet long. We had B screw 2x4's into the back for the legs and to hold up the 2x8's.
 Then we tried this wonderful technique for aging wood. We soaked steel wool in vinegar for at least 4 hours, added some (about a cup) water after they soaked, then scrubbed the boards with the steel wool.
 This is how it turned out.
 Then we took my favorite wrapping paper, spray adhesived it to the wood, put a water color of brown over it, let it dry. It wrinkled the paper and I loved the texture it added. After it dried, we dry-brushed cream paint over the black flowers to tone them down. Let it dry, then sealed the paper with clear, satin polyurethane.
 This made the paper curl some, but the texture was great, so I just nailed down the edges of the paper that curled.
 Next, we took muslin and silk and ripped it into 4 and six inch strips. We had to use Rit dye for the teal/aqua color on some of the muslin because I couldn't find that color. The natural muslin was left alone because it's texture was a little rougher than the muslin we used to dye. The silk was stuff I already had.
 And a project isn't a project until the hot glue comes out! My SIL called it the crafter's power tool. Too true. And you can't truly due a project until you get burned by the glue gun, too! Anyway, enough about the glue gun. I cut out three cardboard circles, small, medium, and large. We hot glued the fabric strips around the outside edge first, then filling in the middle, pinching the fabric to make the gathers. Confusing? Sorry.
 We placed the fabric flowers, and then I used green mesh floral wrap for leaves. I cut long strips of it, wrapped the center with floral wire, then stapled the flowers and leaves to the wood in whatever fashion.
 My blessed B screwed in the 2x4's into the bed frame, and my good boy helped hold up the beastly headboard. Man, it was heavy! It took about 20 minutes to move it from the garage to the bedroom just because I had to keep resting!

Pretty close to the painting! And now I really need new bedding!

Monday, August 30, 2010
Birdhouse, Night light and Lady's room
I've got a thing for trees. I love them. I just do. I can't help myself. In our house back east, I painted a tree in my kids' room in the corner, floor to ceiling, and on the ceiling. I seem to still want that. So, since we moved into a rental and I can't paint the wall, I made a tree out of cardboard. You can see parts of it behind the night light. The night light was a lot of fun. It hangs above her bed and has LED Christmas lights in it. The lights don't get hot, they save energy, and they're blue! So, it almost looks like a moon or fireflies caught in the japanese lantern. I also had this awesome sunflower that is seriously 4 feet across. It hung above the stairs back east, and it's just so happy I had to find a place for it here.
 The room is still in progress, probably always will be.
 Entry to the room.
 Pretty good shot of most of the room. At least the tree, bed and book house. Remember the pvc house we built last time? Well, Lady wouldn't allow us to break it down, so we had to move it to her bedroom. It sits between her bed and bookshelf (that we built this spring and posted about that a while ago.) We left one side open to the books, filled it with pillows, and she decorated it like Christmas. She loves it.
 I also made this birdhouse for her tree and thought I'd include instructions because it's made from recycled stuff and I love that. I took a cereal box and a granola bar box and a paper bag.
 I cut the granola bar box in half,
 Taped it to fit in it's corners so it would be pitched like a roof. I covered all the boxes in the brown bag paper.
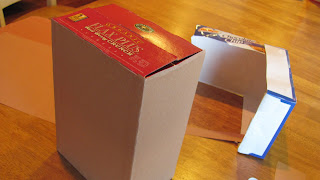 Hot glued the roof to the cereal box, hot glued felt cut-outs on the box, stuck a pencil in the bottom and cut out a hole for the bird to go in.
 Home, tweet home.
 The night light was a lot of fun. It hangs above her bed and has LED Christmas lights in it. The lights don't get hot, they save energy, and they're blue! So, it almost looks like a moon or fireflies caught in the japanese lantern. I also had this awesome sunflower that is seriously 4 feet across. It hung above the stairs back east, and it's just so happy I had to find a place for it here.
 The room is still in progress, probably always will be.
 Entry to the room.
 Pretty good shot of most of the room. At least the tree, bed and book house. Remember the pvc house we built last time? Well, Lady wouldn't allow us to break it down, so we had to move it to her bedroom. It sits between her bed and bookshelf (that we built this spring and posted about that a while ago.) We left one side open to the books, filled it with pillows, and she decorated it like Christmas. She loves it.I also made this birdhouse for her tree and thought I'd include instructions because it's made from recycled stuff and I love that. I took a cereal box and a granola bar box and a paper bag.I cut the granola bar box in half,Taped it to fit in it's corners so it would be pitched like a roof. I covered all the boxes in the brown bag paper.Hot glued the roof to the cereal box, hot glued felt cut-outs on the box, stuck a pencil in the bottom and cut out a hole for the bird to go in.Home, tweet home.
 Saturday, August 7, 2010
Pvc Pipe Play house
I finally got to this project. Thanks to Wintertree Design for her instructions. We modified it just a little. We made the connection from the roof to the cross connectors longer for a taller roof. I can actually stand inside it. We took old (repurposed-love it!) curtains and hung them around the side, they worked out really well.
 Lady actually hung a flashlight from the cross bar on the roof for a night light and she slept in it a few nights ago.
 We still need to add a front door and some details. Any ideas?

 Then we got to my son's loft bed. This was completely constructed from our own plans, so we made it up.
 Talk about a custom house. It will eventually be a fort.
 My son actually cut the pipe himself. He loved it.
 Great summer time project.
 We took old (repurposed-love it!) curtains and hung them around the side, they worked out really well.
 Lady actually hung a flashlight from the cross bar on the roof for a night light and she slept in it a few nights ago.
 We still need to add a front door and some details. Any ideas?
 Then we got to my son's loft bed. This was completely constructed from our own plans, so we made it up.
 Talk about a custom house. It will eventually be a fort.
 My son actually cut the pipe himself. He loved it.
 Great summer time project.
Sunday, July 11, 2010
Dots baby shower
 June was insane. But somehow I was able throw a baby shower for my sweet, very, very pregnant friend. But because of the insanity of the month (we moved, school was in its final phases, scout camp, youth conference, blah, blah), I chose to do a simple theme of just dots and circles of primary colors and brown. Above is the invitation that I made on Photoshop Elements. (My first attempt at Photoshop, not too bad.)
 This is the centerpiece. I filled my three cylinder vases with these. The tall one has alphabet blocks. The middle is filled with wiffle balls (circles on circles!) and the m&m's in the small one had a spoon in them and were part of the refreshments. I put paper circles on the table over a white table cloth.
 The favors were just m&m's in a basket tied with tulle. More circles.
 As they entered for the shower, they wrote notes on clean diapers so my friend could have some reading material or some laughs while she was changing diapers. Some of my favorite notes said, "does this diaper make me look fat?" and "Daddy's turn." The written-on diapers went into the "dirty" basket.
 Favors again.
 I glued the invite on a big red circle and wrote "come in" with chalk on the blue circle so people knew to just come in and we didn't have to answer the door. The refreshment table had five salads, spinach dip and french bread, snickerdoodles, and Costco cream puffs. (And m&m's). We played only one game where we made babies out of bubbleliscious bubble gum on index cards. Laura got to choose which baby she liked best and the winner got a package of Sugar Babies ('cause that's what we made.) Then we opened presents. It turned out to be nice and simple, and fun still. Congrats, Laura, with your new arrival!
Thursday, May 27, 2010
Place mat purses
 My MIL taught me how to make these about two or three years ago. Funny how what goes around, comes around. This year for mother's day, guess what I made for her.
 Yep. A placemat purse. A different placemat and with a few alterations from what the original instructions were, but still a purse. Interesting, too, how useful place mats are and for more than just a place mat. I was intending them to be used for scripture totes. My MIL likes red a lot, so the red one is for her.
 And my mom likes softer colors, so this is more gentle for her.
 Hope they like them. Happy Mother's Day.
Sunday, April 25, 2010
Lamp shade
 I hate lamp shades. They are so hard to figure out. What I've concluded about them is to never, ever buy them separately from the lamp. Or to add blue flowers. Which is the mistake that happened here. I had a perfectly good drum lamp shade. Plain, but good. Here's the problem: I always think plain is just not enough. In this case, it should have been. So, after I added the blue flowers, the shade looked a little too wedding-cake-ish. Not going to fly on the lamp. Not at all! So I had to laboriously pull (rip) each fabric flower, (which had been attached very well!), off of the shade. It left horrible pock marks of hot glue all over the shade where the flowers were attached. See here:
 Poor lamp shade. It was still very useful, but I just couldn't leave the hot glue unattended. (You never should. Says so right on the hot glue label.)
So, this is how I fixed it. I know-- pretty unoriginal to just add ribbon around the edge of the shade, but I already messed it up so badly before that I just couldn't dare to hurt this poor lamp shade any more.
 Nice and clean. Much better.
Saturday, April 10, 2010
TV console cabinet
 That student budget thing we were living on really got to me. I guess we're still living on it. We got a new TV a while ago, (time to join 2010, summer!) after not having one for about a year. And this new TV had no home in our house for a while until I found this cabinet.
 In 2 pieces!?! It was a sawed-off hutch that also had a removable base, which is what you see here.
 The top of the hutch was simply cut right off before I bought it, but it left these huge, ugly grooves in the top. I found it at a thrift store (yet again) and a lady who watched me buy it said, "Oh, I'd never buy that thing. But she's young and ambitious." I thought, "why yes, I am. And a little bit crazy, but that's always served me well." I loved being referred to as "young." I like to think I am. I wasn't about to reveal my true age. I won't here, either.
 This baby had tons that needed fixing, hence, the "ambitious" part of the above comment. It was missing a hinge on one of the middle doors. You already saw that it was in two pieces and had gouges in the top.
 The glass in this door was broken.
 And some of the moulding on the base had come off, but we still had the piece.
 Step 1: get the broken glass out of the door. I thought this would be easy. NOT SO! I was very wrong. First, I had to remove the wood that held in the glass. Not hard at all. Gloves and putty knife were all that I needed.
 Then came the glass, which was actually GLUED in! Oh nooooo! Glue? So, I researched how to remove glass from cabinet doors and came across some pretty great websites. One said to use a heat gun to melt the glue and then pull out the glass. Ahh, I don't have a heat gun.
 But I have a hair dryer! And it worked!
 Slowly, but 2 hours (yes, a heat gun would have been much, MUCH faster!) I got the silicone to soften enough to pull out the glass. Halleluiah! After the glass was out, I went to Lowe's and had them cut a new piece of glass for me, costing a whole 6 bucks! And it took no time. They cut it for me right there in the store on a really cool wall mounted glass cutter. I was impressed.
 I filled in the grooves with wood putty and let it dry FOREVER! (Can you tell this project was getting long? Maybe I was too ambitious. I am learning.)
 Primed everything. And somewhere in there put the molding back on the base.
 Then painted! I also used old hardware I had to replace the existing hardware.
 It's a great size for that wall.
 And for the TV. Thanks to B for mounting that.
 Tada! Pretty insane project, but it's done and was a total of $41 out of pocket. We won't count up elbow grease or cost of labor hours spent. But all in all, not too bad. Don't know if I'll do that again, though.
Subscribe to:
Comments (Atom)