
That student budget thing we were living on really got to me. I guess we're still living on it. We got a new TV a while ago, (time to join 2010, summer!) after not having one for about a year. And this new TV had no home in our house for a while until I found this cabinet.

In 2 pieces!?! It was a sawed-off hutch that also had a removable base, which is what you see here.

The top of the hutch was simply cut right off before I bought it, but it left these huge, ugly grooves in the top. I found it at a thrift store (yet again) and a lady who watched me buy it said, "Oh, I'd never buy that thing. But she's young and ambitious." I thought, "why yes, I am. And a little bit crazy, but that's always served me well." I loved being referred to as "young." I like to think I am. I wasn't about to reveal my true age. I won't here, either.

This baby had tons that needed fixing, hence, the "ambitious" part of the above comment. It was missing a hinge on one of the middle doors. You already saw that it was in two pieces and had gouges in the top.

The glass in this door was broken.

And some of the moulding on the base had come off, but we still had the piece.

Step 1: get the broken glass out of the door. I thought this would be easy. NOT SO! I was very wrong. First, I had to remove the wood that held in the glass. Not hard at all. Gloves and putty knife were all that I needed.

Then came the glass, which was actually GLUED in! Oh nooooo! Glue? So, I researched how to remove glass from cabinet doors and came across some pretty great websites. One said to use a heat gun to melt the glue and then pull out the glass. Ahh, I don't have a heat gun.

But I have a hair dryer! And it worked!

Slowly, but 2 hours (yes, a heat gun would have been much, MUCH faster!) I got the silicone to soften enough to pull out the glass. Halleluiah! After the glass was out, I went to Lowe's and had them cut a new piece of glass for me, costing a whole 6 bucks! And it took no time. They cut it for me right there in the store on a really cool wall mounted glass cutter. I was impressed.

I filled in the grooves with wood putty and let it dry FOREVER! (Can you tell this project was getting long? Maybe I was
too ambitious. I am learning.)

Primed everything. And somewhere in there put the molding back on the base.

Then painted! I also used old hardware I had to replace the existing hardware.

It's a great size for that wall.

And for the TV. Thanks to B for mounting that.

Tada! Pretty insane project, but it's done and was a total of $41 out of pocket. We won't count up elbow grease or cost of labor hours spent. But all in all, not too bad. Don't know if I'll do that again, though.
 The night light was a lot of fun. It hangs above her bed and has LED Christmas lights in it. The lights don't get hot, they save energy, and they're blue! So, it almost looks like a moon or fireflies caught in the japanese lantern. I also had this awesome sunflower that is seriously 4 feet across. It hung above the stairs back east, and it's just so happy I had to find a place for it here.
 The room is still in progress, probably always will be.
 Entry to the room.
 Pretty good shot of most of the room. At least the tree, bed and book house. Remember the pvc house we built last time? Well, Lady wouldn't allow us to break it down, so we had to move it to her bedroom. It sits between her bed and bookshelf (that we built this spring and posted about that a while ago.) We left one side open to the books, filled it with pillows, and she decorated it like Christmas. She loves it.
 I also made this birdhouse for her tree and thought I'd include instructions because it's made from recycled stuff and I love that. I took a cereal box and a granola bar box and a paper bag.
 I cut the granola bar box in half,
 Taped it to fit in it's corners so it would be pitched like a roof. I covered all the boxes in the brown bag paper.
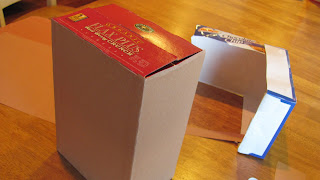 Hot glued the roof to the cereal box, hot glued felt cut-outs on the box, stuck a pencil in the bottom and cut out a hole for the bird to go in.
 Home, tweet home.


 Poor lamp shade. It was still very useful, but I just couldn't leave the hot glue unattended. (You never should. Says so right on the hot glue label.)


